Blackboard Collaborate: Staff Frequently Asked Questions
Return to Blackboard Collaborate For Staff Main Page ↵
| Blackboard Collaborate has a 250 attendee limit. If you wish to use Blackboard Collaborate with more than 250 attendees view our guide. |
Want to test Collaborate? You can use this test room. |
Getting Started with Blackboard Collaborate Ultra
-
Blackboard Collaborate is a real-time video conferencing tool like Zoom or MS Teams, that lets you to add files, share applications and use a virtual whiteboard to interact with students.
Collaborate with the Ultra experience opens right in your browser, so you don’t have to install any additional software to join a session.
-
- A Blackboard course.
- A computer with the Google Chrome or Firefox browsers installed.
- An Internet connection. (Preferably not wireless, as reliability can vary.)
- A microphone to capture audio. A combined headset and microphone or an echo-canceling microphone works well to avoid echoing and feedback.
- A webcam if you plan to share video.
-
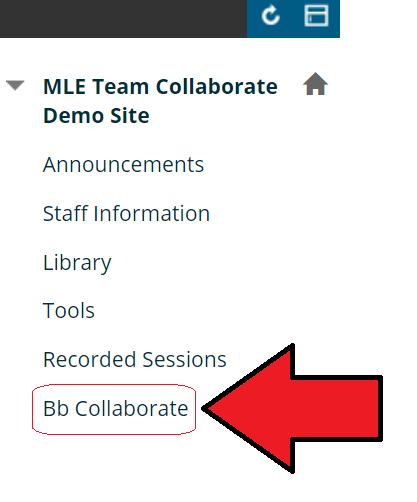
There are two ways you can use Collaborate Ultra in a Blackboard course. They both start from the Bb Collaborate menu item in your course.
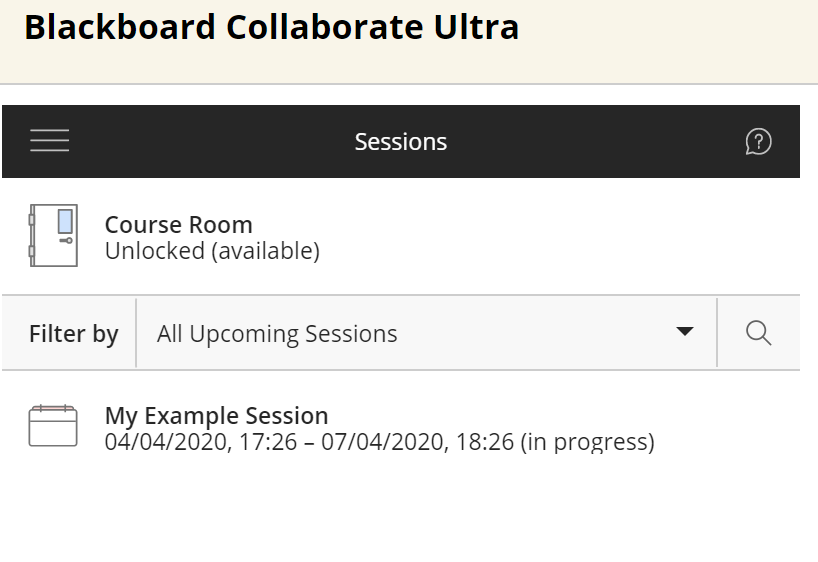
You can use the Course Room, which is an open Collaborate session dedicated to your course. Learn more about the Collaborate Ultra Course Room.
You can schedule sessions for a specific date:
Go to the Control Panel of your Blackboard course.
Click Course Tools and select Blackboard Collaborate Ultra.
Click Create Session.
Type a meaningful name for the session.
Set the start and end date and times of the session. You can also choose to keep a session open or repeat it.
Set an Early Entry point. This is the period of time before the start of the session that users can join.
Optionally, open Session Settings and select what students can do in the session. Learn more about Collaborate Ultra Session Settings.
By default, anyone with a participant role can share their audio and video, post chat messages, and draw on the whiteboard and any shared files.
Select Save.
-
Google Chrome or Firefox are recommended. Google Chrome has best results. Any browser that supports WebRTC should be fine.
-
You can have up to 250 people in your session as standard. Should you need more than that then you need to activate a feature to your scheduled session in advance as shown in this guide. The absolute maximum is 500 in this mode.
-
Yes. Having a picture helps participants to get a mental image of you are and can be used when webcam video is not being shown. If you do not want to share a picture of yourself, consider using a picture of a pet, hobby, or favourite travel destination.
-
We have a quick guide on how to do this that can be found here: https://elearn.southampton.ac.uk/collaborate/staff/removefrommenu/
-
To join a Collaborate session you will need the following
- A modern computer or laptop. You can also use a Android or iOS device.
- Access to your Blackboard course so you can get the link.
- Internet Access (Broadband connection highly recommended).
- Soundcard with microphone and headphones (A USB headset with microphone/headphones is highly recommended). If you have Bluetooth on your computer or device a set of Bluetooth headphones with a microphone should work as well.
- Webcam (optional).
- For the best experience, use the latest version of Google Chrome. The latest version of Firefox will work as well. The latest version of any browser that supports WebRTC should be ok, but Chrome is best. View the official browser support list.
- Using a headset is preferred, users without headsets should be sure to be in a quiet area to prevent background noise, and should turn off their microphone when not speaking.
- Be in a well lit area if transmitting video.
-
Here are some recommendations from Amy Eyre who runs the Blackboard Mobile / Collaborate User Group
- For webinars:
- Logitech 960 Wired Headset: Excellent microphone, simple to set up, can feel a bit warm after an hour of use.
- For small meetings with attendees in the same (small) room and others online:
- Plantronics Calisto 610 USB Standard Version Speakerphone: While we only have experience with an earlier version that is no longer available the reviews of this update make it sounds just as good as the earlier model we have been using for years.
- For hybrids:
- Samson UB1 USB Omnidirectional Microphone – USB boundary microphone that picks up all audio from a decent sized seminar room with little trouble, used for all hybrid sessions at the University of York.
- Logitech 960 Wired Headset: Excellent microphone, simple to set up, can feel a bit warm after an hour of use.
We really like the look of Catchbox microphones and have seen them used well at conferences in the past, but they are very expensive! Introductory video to catchbox mics here [YouTube].
The following have been mentioned by the user community:
- For Webinars:
- Jabra Headsets (nice and crisp sound, portable)
- Sennheiser Headsets – Reading Recommendation
- Summary Document inc. Audio/Visual Recommendations – Cardiff
- Gigaware USB Stereo Headset with Microphone – Cardiff Recommendation
- Plantronics USB Headsets – Cardiff Recommendation
- Any USB Headsets from Microsoft and Logitech (with noise-cancelling mics) – Cardiff Recommendation
- Sennheiser SC 60 USB Headset with Microphone – Cardiff Recommendation – Good clear microphone that doesn’t catch background noises
- Logitech C930e Webcams – Reading Recommendation – Used throughout campus
- For Hybrids:
- ClearOne Chat 150 USB Conference Mic – Good lack of feedback
- BOYA Dual-Channel Wireless Microphone System – Glasgow Caledonian Recommendation – Requires some AV knowledge to get going, but allows to wireless microphones to be used in the same room simultaneously
- Plantronics Calisto P620 Wireless Bluetooth UC Speakerphone – Edge Hill Recommendation – Good quality connection with Collab (no drop out) and is wireless, also has built in speaker
- For webinars:
-
Collaborate uses dynamic bandwidth adjusting for Chrome and Firefox users. This allows Collaborate to actively monitor a user’s network connection and adjust the download speeds before a user should experience issues.
The primary factors in bandwidth consumption for Collaborate Ultra are sharing webcam videos and sharing applications.
- Webcam video bandwidth uses ranges from 360kbps down to 20kbps per camera, up to 4 cameras
- Audio always uses 48kbps
- Ability to receive application sharing and audio as low as 88kbps
- Application sharing bandwidth uses ranges from 500kbps down to 70kbps
- It can show 4 cameras with audio as low as 128kbps and with a max of 1488kbps.
A small amount of overhead is also required for chat, and so on.
If network conditions falter and can’t sustain the minimum bandwidth needed, Collaborate will turn off cameras and application sharing. For 1 camera and audio the trigger will be 68 kbps and for application sharing and audio 118 kbps.
When network conditions improve, the cameras and application sharing will turn back on automatically for Chrome and Firefox users.
For sessions where bandwidth is a concern, we recommend that no attendees share their webcam video unless required for the instruction. We also recommend that the moderator or presenter use file sharing and whiteboard for content instead of application sharing. Use application sharing when it is required for the instruction. With no video and application sharing, a user with 128kbps connection will be able to participate fully in the session.
-
By default Collaborate with the Ultra experience will be using UDP on the port range 49152 through 65535, if your organisation has a firewall in place that is not open to this range, we will next try UDP 50000 and if that fails we will allow traffic to connect via TCP on port 443. It should be noted that TCP is a slightly slower connection protocol than UDP, but the experience should still be acceptable.
Additionally, Collaborate with the Ultra experience uses HTML5 Web Socket traffic to connect to session servers. Network traffic filters such as Cisco Firepower may have a filter added to prevent HTML5 and thus WebRTC from connecting.
Furthermore, Proxy servers need to allow HTML5 Web Socket traffic in order for Collaborate to connect to the session servers through a proxy. Proxy servers may need to be specifically configured to handle this Web Socket traffic. Collaborate with the Ultra experience requires a HTML 5 Web Socket connection be allowed on browsers and networking appliances such as proxy servers. To test the Web Socket connection please use the same setup that is failing to connect to the Collaborate with the Ultra experience. For example if you are using a proxy server, please try this test from behind the proxy server.
- In a browser, go to the following link: https://www.websocket.org/echo.html
- Enter this text in the Location text box: wss://echo.websocket.org
- Click the Connect button.
- Once connected, press the Send button. The output will appear in the Log section.
- A successful Web Socket test will show a Response in the logs for “Rock it with HTML5 WebSocket”.
Users trying to connect from networks that do not allow HTML 5 Web Socket connections will be unable to launch a Collaborate with the Ultra experience.
-
The following section is an extract from a blog post on the Blackboard Community site by Lloyd Stock. Since the site is not publicly visible useful extracts follow:
- If running a session on multiple campuses across timezones, e.g. Dalian, USMC, and Southampton, use Every Time Zone to pick a date for your session and see at a glance the best time to meet across timezones. For live timings on our campuses check http://mytime.southampton.ac.uk/
- Before your session, print this Door Hanger out on card and hang it to let people know you’re not to be disturbed. We’ve all seen the viral video of the expert who had his video link news interview interrupted by his toddler. Though in fairness, you’ll need more than a door hanger with toddlers!
- Moderators could pre-load an Orientation slide like these ones.
- If you’re going to run an Audio Check, don’t do it without using an Audio Check Slide.
Preparing sessions
-
First you need to be able to get into the session. If it is not open ended you will not be able to get in until the start time (minus up to one hour early entry depending on how you set it up).
To get around this edit the session start time to the present, and join in the session. Then when done leave and go back to the scheduler settings panel to change the start time back to a future date/time.
Pre-loading files
Files can be pre-uploaded and they will remain after you have left that session and go back to that specific session later.
Polls and breakout areas
Polls and breakout areas are created on-the-fly in a session. You can create one poll and launch it in the session. As long as you do NOT end the poll it will remain open when you return to the session. However anyone who joins the session can open it immediately. Therefore this approach is not very practical.
You can only assign attendees to breakout groups when they are in the session. You cannot assign people who are not in the session currently to breakout groups. If you create and name breakout groups and then leave a session those settings do not remain when you rejoin.
Better ways to pre-prepare polls
- The answers to poll questions tend to have numbers starting at 1 on the left. You could set the questions and answers in your PowerPoint file (along the top half so that the questions are not obscured by Collaborate’s controls) and advise your attendees to look at the slide and just pick the corresponding number in the pol.
- If possible, have a second person assisting in your session, have them prepping your polls in advance whilst you’re still presenting and then making them live when you’re reading.
- Create your poll questions and answers in advance in a word processor/digital notepad, then just copy and paste them into Collab when you need them.
- Share computer screen, use third party polling tool such as Vevox.
Remember
When you leave files in your Collaborate session any moderators and presenters can access them. This includes students you temporarily promote to the presenter role.
- Do not leave confidential files in a Collaborate session.
- Remove files when you have finished using them.
-
There is no notification to students about upcoming Collaborate sessions.
Therefore you may wish to create announcements letting students know about upcoming Collaborate sessions that week, and send emails to all students an hour before a session is due to start.
-
Which technologies (such as browsers and operating systems) and what equipment (such as microphones and headsets) here is what works best with Blackboard Collaborate: https://elearn.southampton.ac.uk/collaborate/tech/
International Usage
-
When you set the time for a session to start and a user in a different time zone views the details of that session the start time will be translated into their computer’s local time zone.
For example if an instructor in the UK set a session to begin at 09:00 BST, it will be open to a user in China at 16:00 China Standard Time.
-
Please review this section of our Collaborate technology page where we are updating information based on feedback on usage in China.
What else can be done with Blackboard Collaborate Ultra
-
Yes. You may create a session with no end date. You can make this choice when you are creating a session. There is also a standard open session created automatically for all courses that can be used for this purpose.
-
If the moderator allows it when they set up the session, people will be able to call in with their phone. They can also do this after opening collaborate and then get a number to dial in and speak over the phone but use the chat and view the screen as normal.
-
Android and iOS users can just use Chrome and Safari respectively without needing an app.
-
Yes, but it should be remembered that moderators can see the content of private chats sent between attendees.
-
No. To use the closed captioning feature, you will need to appoint someone on the session with the role of Captioner and then they would be able to create Captions by typing it out themselves.
-
Yes. You can promote one or more students to the role of Presenter, which would allow them to upload files and show them to everyone in the session. You can also demote them back to the Participant role when they are finished.
-
Yes, you can use the Breakout Groups feature to divide participants into small groups. When participants are placed in breakout groups, the session audio will split automatically so they only hear the audio of the other participants in their breakout group.
-
Yes. You can mute the microphone of one participant or all participants. This will “mute” their microphones, but will not prevent them from reopening their microphones.
-
In this case, you would go to your session settings and uncheck the box that enables them to share their audio. You can also turn off the ability for them to share their video, use the text chat tool, and to mark on whiteboard slides and shared files.
-
Everyone in your session can share their video at the same time, but only the five most active participants will be shown at any given time.
-
If you share your PowerPoint slides using “Share Files” the animations will not show. If you share them using “Share Application” the animations will show. The animations may appear slow or jerky. If you are using animated gifs, you can upload these as files and share them, this has a better effect.
-
You should only give the moderator role to people who are actually helping you moderate the session. The participant and presenter roles are sufficient for those participants who are not actively moderating the session.
-
Yes. As the moderator, you can easily move from group to group. You can also allow participants to move to different groups, if you wish to.
Recording options with Blackboard Collaborate Ultra
-
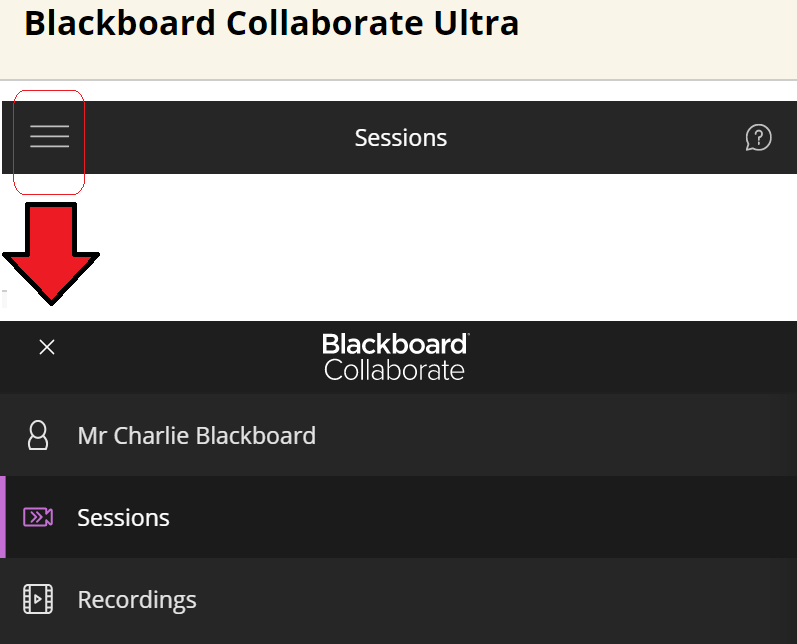
Yes, if you are a session moderator, you can record your session by opening the Session Menu in the upper left-hand corner of the interface and clicking on the Start Recording button.
See our web page Recording your Blackboard Collaborate Session for more information.
Please note: There is limited capacity to hold recordings for everyone. We recommend if you wish the whole cohort to see it, download it, upload to Panopto, and delete it from Collaborate.
-
No, only moderators can record sessions. If a session has been recorded, participants and presenters can view the recordings after they are available.
We have made a web page for students that explains how to watch Blackboard Collaborate Recordings.
-
It is only possible for anyone (staff or student) to download a recording if you enable it. Therefore it is important to enable video recording downloads when creating sessions.
See our web page Recording your Blackboard Collaborate Session for more information.
-
No. Actions and audio from within the breakout groups are not recorded.
-
The time it takes for your recordings to appear varies based on the length of the recording and the traffic on the Blackboard Collaborate Ultra servers. Recordings usually appear within 48 hours or less. If your recording has not appeared after 72 hours, please raise a ticket with ServiceLine.
-
Yes. Please download the recording, upload it to Panopto, and then delete it from Collaborate.
See our web page Recording your Blackboard Collaborate Session for more information.
-
Recordings only download in the MP4 format. If you need to have the recording in a different format, you will need to convert it after downloading.
See our web page Recording your Blackboard Collaborate Session for more information.
-
Dealing with technical issues and problems
-
If you are connecting to Collaborate from outside the UK, follow this link to How to get the best experience when attending a Blackboard Collaborate session from outside the UK
-
If you cannot connect, have a poor connection, or make any changes suggested below :
- Leave the Collaborate session.
- Close the browser you were using to connect to Collaborate (the entire browser and not just the browser tab).
- Wait a couple of minutes and re-open the browser and re-join Collaborate.
-
We recommend using Google Chrome* in the first instance and then Firefox.
Visit the Browser Checker to make sure your browser is supported
A full list of supported browsers and operating systems is available here: Browser Support
*If you are connecting from China see the section above on connecting from outside the UK.
-
How to update Chrome: https://support.google.com/chrome/answer/95414
How to update Firefox: https://support.mozilla.org/en-US/kb/update-firefox-latest-release
-
If you experience problems with Collaborate whilst using Chrome, try Firefox. If you experience problems with Firefox, try Chrome.
-
Ensure that your web browser is allowing third-party cookies, these guides explain how:
-
The next step is to try using the session in a private or incognito window. This resets certain settings and can be an effective way to work around some configuration issues.
How to open an incognito window in Chrome: https://support.google.com/chrome/answer/95464
How to open a private browsing window in Firefox: https://support.mozilla.org/en-US/kb/private-browsing-use-firefox-without-history
-
If that does not help the next step is to try clearing your browser cache. This guide explains how: http://www.wikihow.com/Clear-Your-Browser’s-Cache
-
Collaborate uses a technology called WebRTC. The WebRTC Troubleshooter website tests that this is working for you and can pick up issues and help you to fix them.
-
- Close all programs & browser tabs you are not using while in Collaborate.
- Use a hard-wired (Ethernet) connection, if available.
- If you are using Wifi , sit as close to the router as possible
- Use only supported up to date web browsers (see sections below)
- Use video during the session only when necessary.
If your connection is poor, a connection status indicator appears over your Collaborate profile picture. Move your pointer over it for the connection details. See the Connection status guide.
This publicly available knowledge base article discusses the most common issues when connecting from a domestic connection.
-
The latest versions of OS X have extra security settings you need to make for devices to use the camera and microphone. If you use a Mac / OS X please read through this guide on how to set the correct permissions.
-
Some corporate and institutional networks may block the HTML5 Web Socket traffic upon which Collaborate relies. Try on a domestic connection to see if you get the same issues. If you do not, it could be an issue with the network in the institution or business you are connecting from. Ask the network administrator to review the relevant information here.
-
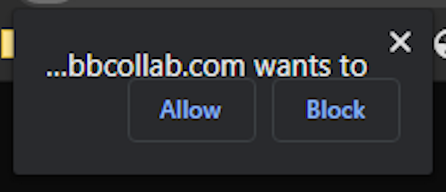
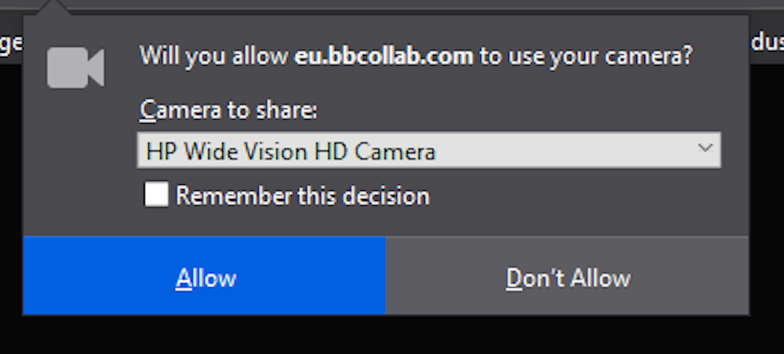
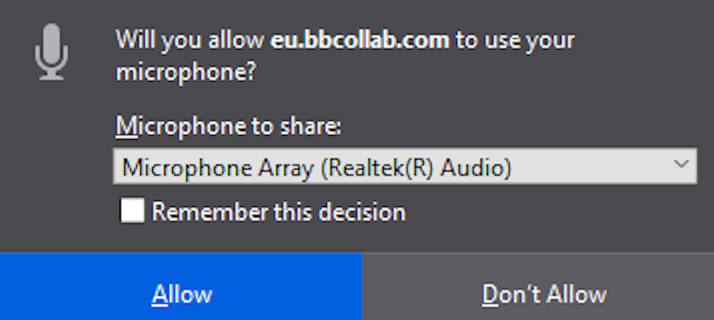
It is vital that you all Collaborate to use your microphone and camera. You are likely to ask to approve permissions that look like this:
-
We can be so used to clicking “no” that we may accidentally prevent Collaborate from having permission to use our microphone and web cam. If you find that people cannot hear you or see you, check that you have given permission for Collaborate to use your camera and microphone.
-
Review the guide at https://support.google.com/chrome/answer/114662
Having reached the Site Settings page, choose “View permissions and data stored across sites” and search for bbcollab. Open all that appear one after the other and choose to allow Camera and Microphone.
-
The process is fairly similar in Firefox, see: https://support.mozilla.org/en-US/kb/firefox-page-info-window
-
Blackboard Collaborate allows you to alter the microphone input and webcam settings, but not the audio output. Blackboard Collaborate will use the system default audio output / playback device, so ensure this is set correctly before opening Blackboard Collaborate. This is particularly important if you have multiple devices connected to your computer, such as speakers, headsets and external monitors.
- Change the default audio playback on Windows 10: https://www.youtube.com/watch?v=YWX4WxMkDxk
- Change the default audio output on OSX: https://www.youtube.com/watch?v=6Lf03JGcS00
-
- Ensure that the correct audio device (speakers) is selected.
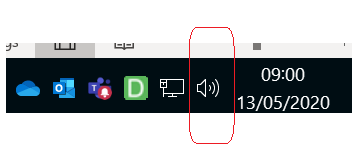
- Windows 10 users, select your audio device by selecting the Speaker button near the clock as shown below:

- Mac users please refer to the following article: Change the sound output settings on Mac
- Windows 10 users, select your audio device by selecting the Speaker button near the clock as shown below:
- Ensure that sound volume on the computer is not muted or set really low.
- Ensure that sound volume on the desired audio output device (e.g., speakers or headset) is not muted or set really low. Some headsets have a mute or volume knob on them.
- Ensure that cables going to speakers or headset are all firmly plugged in.
- If the above do not work, try rebooting the computer and/or try another web browser.
- Try playing a YouTube video to see if there is sound. Collaborate will produce sound using the same audio device (e.g., speakers or headset) as other websites such as YouTube.
- Ensure that the correct audio device (speakers) is selected.
-
Windows 10 allows users to set audio preferences for individual apps. Some apps listen, others don’t. Because Collaborate runs entirely in your browser, you have to check settings for your browser.
1. Right-click the speaker icon in your system tray. This is usually at the lower right of your computer monitor.
2. Select Open Sound Settings.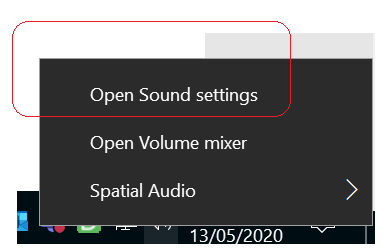
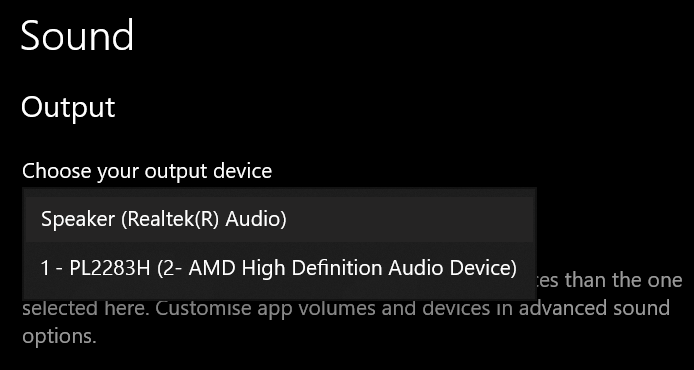
3. Check your default Output device. Normally this will be the speakers or headphones you regularly use, but not always. You can use the dropdown menu to change your default for the system.
But some apps will save their own preferences. So we will need to check those as well.4. Scroll down until you see the Advanced sound options section.
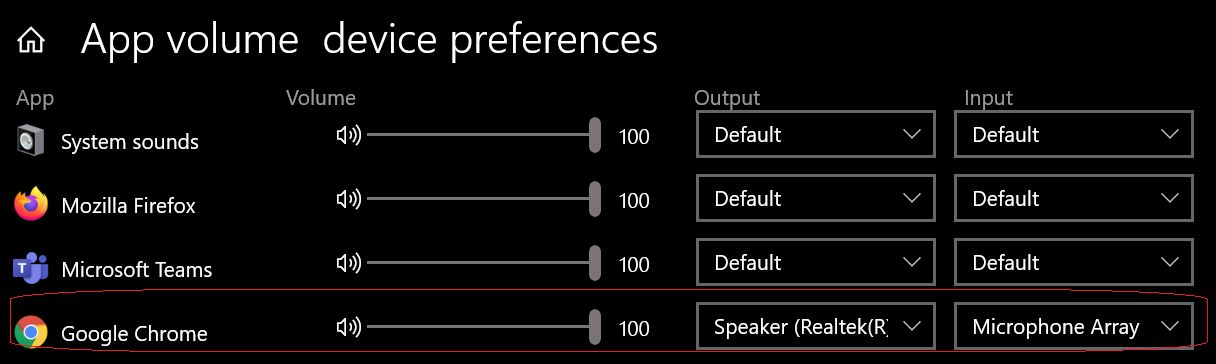
5. Click on the App volume and device preferences link.
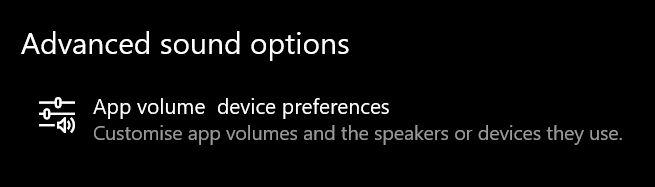
6. Find your browser that you use for Collaborate in the list and check if you have options in the dropdown to select the sound source you expect to hear it from.

Notice that there is also an Input option if you are having problems selecting the correct microphone.
-
Read through and try everything suggested in Blackboard’s support page for
Chrome: https://help.blackboard.com/Collaborate/Ultra/Participant/Support/Chrome_Support
Firefox: https://help.blackboard.com/Collaborate/Ultra/Participant/Support/Firefox_WebRTC_Support
-
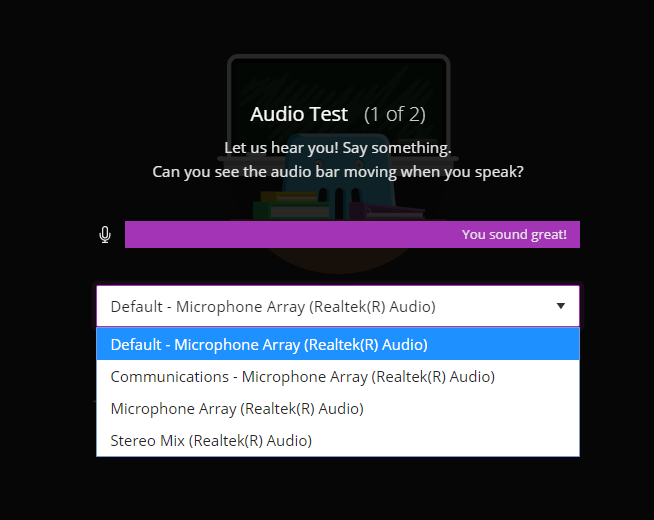
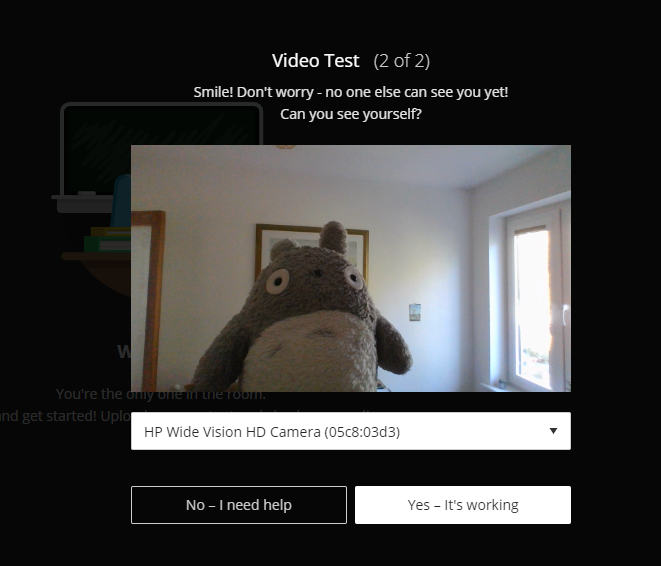
When you use Collaborate for the first time a wizard will guide you through the setup.
It is important to pay attention to the device you choose to use with Collaborate if you have a choice.
-
No luck? Please try going through the wizard again and double check that you have selected the right devices.
- Open the Collaborate Panel.
- Click on the Cog.
- Choose Set up Camera and Microphone.

-
Still not working? Read through the page linked below and check through everything it recommends.
https://help.blackboard.com/Collaborate/Ultra/Participant/Participate_in_Sessions/Audio_and_Video
-
- Let your lecturer know if you are having issues with connecting or participating in a Collaborate session.
- Use the Chat Support in Collaborate to access Blackboard technical support.
- Contact the University IT help – ServiceLine
Collect some useful information that will help us, and add it to the ticket you will raise.
Within the Collaborate session you can capture some date which will be very useful for us to check.
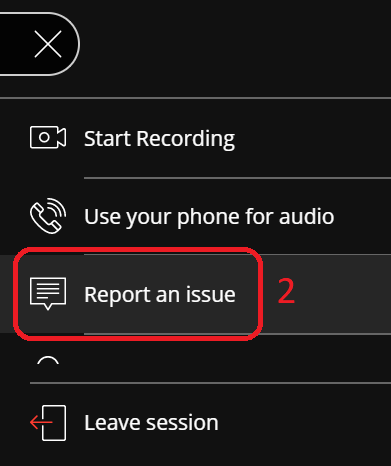
- Open the session menu (the hamburger button at the top right).

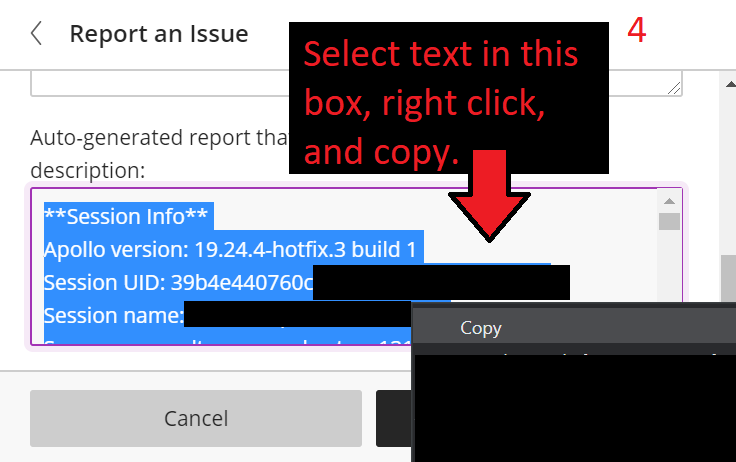
- Click on Report an issue.
- The collaborate panel on the right will open, scroll down this section.
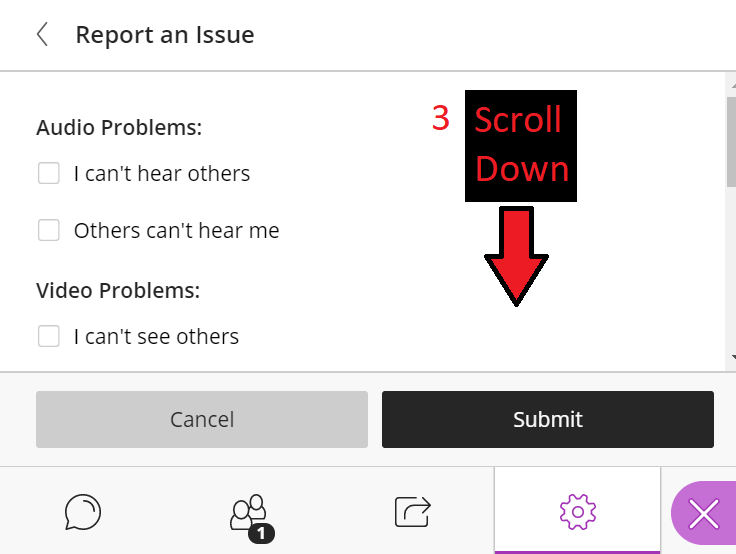
- At the bottom will be a box of diagnostic text, select this text, right click on it, and choose copy. Then raise a ticket via ServiceLine describing the problem you are experiencing and paste in this diagnostic text so we can take a look.