Since Summer 2006 the University has licenced third party plug-ins for Blackboard that provide blog, wiki, and podcast functionality. These have worked well and take up has been reasonable. It was necessary to licence third party plug-ins for this functionality because it was not provided as part of the core Blackboard product.
With the recent upgrade to Blackboard the vendor has introduced their own blog and wiki features which are more embedded into the core application. There are differences between the two but the core functionality remains reasonably consistent.
The University has determined that it is no longer necessary to licence the third party blog, wiki and podcast tools and the decision has been made to not renew the licence for these tools in May 2013. This will provide a substantial cost saving to the University which can be re-invested in further developments to the Managed Learning Environment.
The new blog and wiki tools are currently being documented and from 31 August 2012 the new blog and wiki tools will be enabled.
At the same time the existing “Campus Pack” blog, wiki, and podcast tools will be set to be unavailable to new users.
If you are planning to use blogs, wikis and podcasts, in the new academic year (2012/13) please use the new Blackboard blogs and wikis, instructions for which will be made available on the iSolutions web site from 31 August.
Podcasts can be uploaded as audio files, or if RSS is required the Panopto Lecture Capture system can provide this functionality.
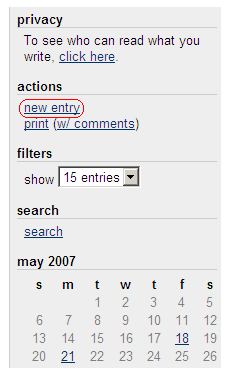
New Entry

1. To make a new blog entry click on New Entry.
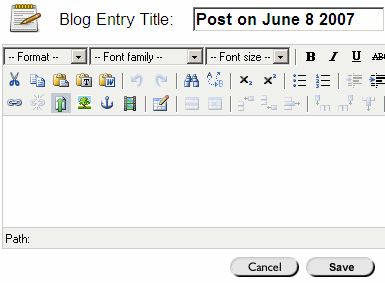
Creating your entry

2. Enter the title of your entry. By default the title will be Post on [today’s date]. You may wish to enter something more meaningful here.
3. Type your entry into the textbox.
4. When you have finished you entry, click on Save.
Icons

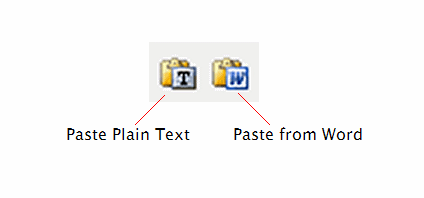
5. Note that there are two icons for pasting text from the clipboard.
a. Paste Plain Text will paste text and remove any formatting.
b. Paste from Word is designed for pasting text from Microsoft Word.
More Icons

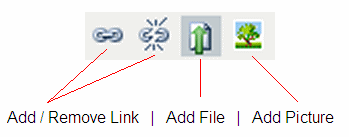
6. These icons allow you add links, files and pictures to your blog entry.
Note that when you add a link you link to an existing blog entry or to an external website. You cannot add links to other parts of your Blackboard course.
Editing your entry

7. Note that you can go back and edit your entry if you wish by clicking on Edit.
8. If you have edited your entry you can view previous versions by clicking on History.
9. If you wish to delete your entry a delete option is available. If the course instructors have allowed it, entries may be permanently deleted by clicking on Purge. If purging entries has not been allowed then the user who created the entry and the instructor are able to recover the entry.
