


The ability to work as part of a team is an essential skill for graduates, and most programmes include opportunities for students to develop it through participation in group projects. This is not always an easy experience for students who are used to individual assignments, and there are often tensions around communication and contribution. In particular, students are very unhappy if team members perceived as ‘free-loaders’ get the same shared grade as those who have done all the work.
There are several online systems available that enable both formative and summative feedback on contributions to group work; notably WebPA, TEAMMATES and CATME. Note that this is different to peer review of assignments, where students review and comment on each other’s work. We were unable to use WebPA for technical reasons, and although we successfully piloted TEAMMATES there were unresolved questions about data protection. My colleague Alex Furr suggested that we could build our own system based around our WordPress portfolio eFolio, and we have just piloted his peer review plug-in with a module in our Business School.
In our pilot, we ran two formative feedback activities and finished with a summative activity that asked students to divide 100 points between all members of the team (including themselves) according to their overall contribution to the group’s work. After moderation to identify and correct undeserved high self-scores, the results were used to adjust a proportion (40%) of the overall group assignment grade to award each student an individual grade that more fairly reflected their contribution.
Overview of features and use
The system supports three types of peer review of teamwork:
- open text comments about the other people in your team
- divide X points between the other people in your team
- use a rubric to grade other people in your team against one or more criteria
The process a module tutor follows is:
- create a module blog in eFolio
- install the peer review plug-in
- create a peer review project
choose the type required and add a title, instructions, optional anonymity (default=no), self-review (default=no) and closing date - upload a CSV with the rubric (if required)
- upload a CSV listing the students’ name, group and email
- when ready, launch the project
all students get an email with a personalised link to their feedback form - student follow the link, add feedback and submit form
they must do this before midnight on the closing date - the tutor can download all feedback as an Excel file and review it
it is easy to identify students who are not engaging, and follow this up - when ready, the tutor can enable feedback
all students get an email with a personalised link to the feedback they were given
Setting up your module blog
and activating the peer feedback plugin
You create a module blog by logging in to eFolio (https://www.efolio.soton.ac.uk/) using your University username and password. Before you log in, take a look at the section ‘What is eFolio?’ on the right of the page to see what else it offers staff and students; you may be pleasantly surprised!
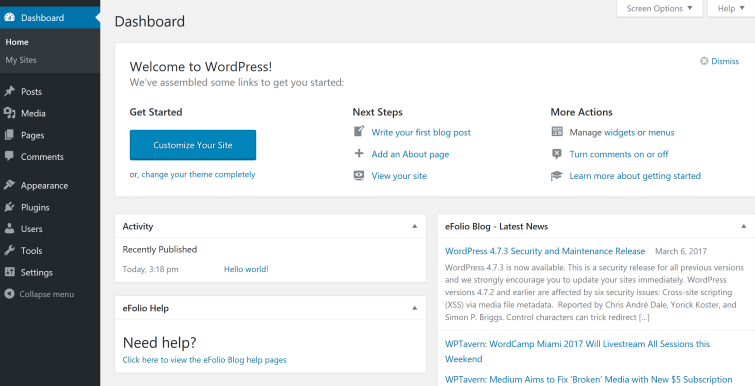
When you log in you will see your Dashboard with a list of the modules you teach; eFolio automatically gathers lots of relevant data from Banner and other University systems. Select the module you wish to use peer review with.
Your module has a series of tabs; select Module Blog and click the button to create a module blog for students.

You will get a message confirming success, and two large buttons, one of which enables you to edit your Blog settings. The next time you want to create or edit a peer review activity, all you need to do is log in to eFolio, select your module, click the Module Blog tab and then the Blog settings button.

The next step installs the peer review plug-in to this module blog. You only need to do this once for each module. Click the Blog settings button to see your module blog dashboard:
Select Plugins in the menu on the left, and then search for ‘Peer’ to find the right plugin:
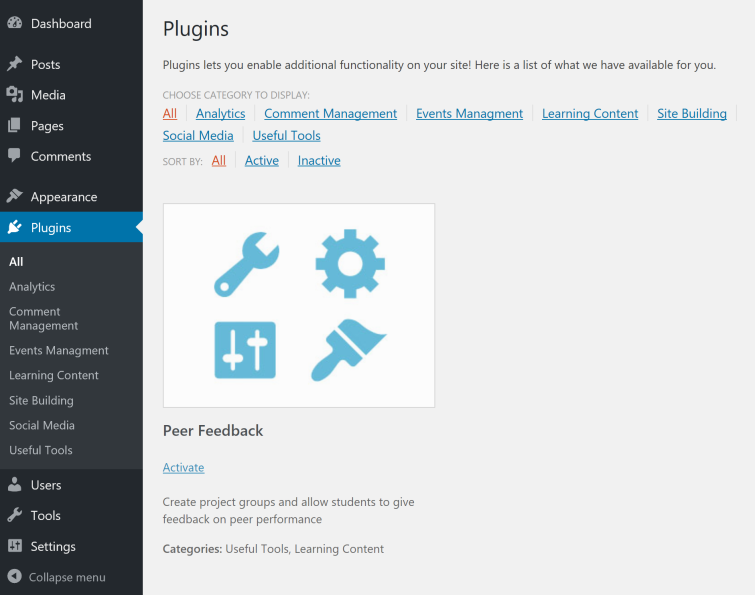
Click Activate to add this plugin to your module blog. You’ll notice that Peer Feedback now appears as an option in your module blog dashboard – click it to create, edit and control your peer feedback activities – each of which is called a Project (e.g. Add New Project):

Creating a peer feedback project
Log in to eFolio, select your module, click the Module Blog tab, then the Blog settings button and finally the Peer Feedback menu item.
Click the Add New Project button and enter the following details on the form:
- Title (please avoid using dashes as they appear in the system emails as – )
- Description (usually guidance to students on completing this peer feedback activity)
- Anonymity – if this checkbox is ticked then students will not see the name of the student that gave them each piece of feedback. The default is OFF i.e. feedback is not anonymous.
- Self Review – if this is checked then students will also need to rate themselves. The default is OFF i.e. no self-review
- Feedback Type – select using the drop-down menu:
1. Written feedback only – students type their feedback
2. Criteria Grid (Rubric) – students select their feedback from a range of options
3. Distribute X Points – students choose how to divide X points between team members; you will need to enter X, the number of points. - Submission Dates – click on the Closing Date field to choose the deadline. Feedback can be submitted up to 23:59 (i.e. midnight) on the date selected.
Click the Publish button to complete this process – you can edit most details later if necessary by clicking on the project’s Title.
Click on Peer Feedback in the dashboard menu to view the list of projects:
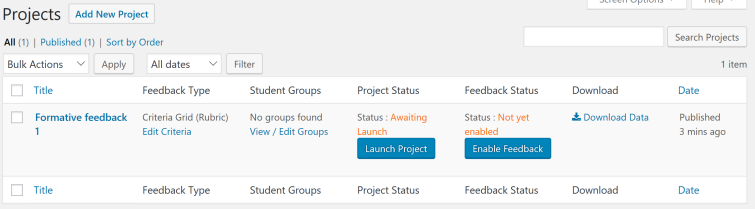
If you chose the feedback type Criteria Grid (Rubric) use link Edit Criteria under Feedback Type to Upload your criteria.
- You must upload a CSV file; see this example.
- Column A lists the criteria, Row A lists the levels. The grid cells contain the text descriptions for each criteria/level.
- Please make sure the filename does not include spaces or special characters.
- Check the criteria grid after it has been uploaded; you may see ’empty’ criteria rows caused by a space character somewhere in that row of the CSV file. If that happens, select those rows in Excel and delete them, then re-save your CSV and upload it again.
Use the link View/Edit Groups under Student Groups to upload a list of student names, emails and the groups they are in.
- You must upload a CSV file; see this example.
- Column A is the group name, Columns B and C are the student’s first name and surname, Column D is their email (@soton.ac.uk only). There is no header row.
- Please make sure the filename does not include spaces or special characters.
- It is not possible to edit this list after the project has been launched (i.e. students have started providing feedback) so please make sure the student groups are correct.
- If you need to make changes before the project is launched, correct the CSV file and upload it again.
Running the peer feedback project
Make sure that your students understand the purpose of the peer feedback activity. Is it formative or summative? Will their feedback be anonymous? Do they have to self-review? When is the deadline? What should they do about the feedback they receive?
Log in to eFolio, select your module, click the Module Blog tab, then the Blog settings button and finally the Peer Feedback menu item.
Click the Launch Project button – all your students will receive an email with a personalised link that will take them to their feedback form.
From: www.efolio.soton.ac.uk <wordpress@efolio.soton.ac.uk>
Sent: Friday, March 10, 2017 11:08
Subject: Feedback now available for the project First Formative task
To: student.a (as1n15) <as1n15@soton.ac.uk>Dear Anna Student,
Feedback is now available for the group project First Formative task. Click the link below to view your feedback
https://www.efolio.soton.ac.uk/blog/mang1017-2016-17/?peer_projects=first-formative-task&password=J7xv1pZsAhC1Qjy3&userID=437Do not reply to this message
Once the feedback deadline has passed, you can click the button again (its label has changed to Switch Off) to prevent students.
The Download Data link provides a CSV file that can be saved and opened in Excel.
Analysing the Results
Criteria Grid (Rubric) data groups the feedback received by each student. This example shows how the results might be interpreted:
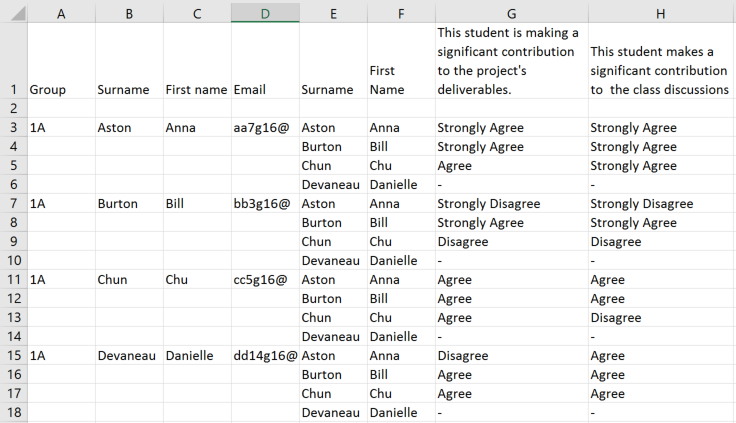
Columns G and H list the ratings for each students against the two criteria used in this example.
The first student, Anna Aston, has received good feedback from everyone apart from Danielle Devaneau, who didn’t provide any feedback at all.
The second student, Bill Burton, claims he has made a strong contribution, but his team disagree. The tutor may wish to contact this student and see what help they need to engage with the group project, or whether there are issues with the group’s dynamic.
The third student, Chu Chun, is doing fine and will hopefully be reassured by the feedback.
The last student, Danielle Devaneau, seems to be doing fine, apart from failing to provide any feedback. Anna Aston has a low opinion of her contribution to deliverables, but as a high-achieving student may have different view of the level of contribution required.
For large cohorts, conditional formatting can be applied to columns G and H to visually identify clusters of good and poor feedback.
- In Excel, select all feedback columns and click Conditional Formatting;
- Select the Manage Rules option and add a New Rule;
- Select Rule type Format only cells that contain and then Cell Value – equal to – Strongly Disagree (or whatever text string you need to identify);
- Click the Format button and set the cell Fill Color to red (for example)
- Click OK and then repeat steps 2-4 for the other text strings you wish to identify visually.
- Click OK to finish.
Point Distribution data includes calculated scores for each student.
- Normalised Score is derived from the WebPA algorithm. Click here for an example
- Feedback is 1 or 0, depending on if they have given any feedback or not
- Fairness is calculated in the following way:
Self rating score given by that student ÷ (Available points ÷ Number of Students)for example:
- There are 5 students in the group, with 100 points to distribute.
- Student A gives themselves a rating of 40 points (the remaining 60 distributed among the other group members).
- Their Fairness rating would be 40 ÷ (100 ÷ 5) = 2
Values higher than 1 mean that student has given themselves an above average score, and tutors may wish to look at those above, say, 1.5. This doesn’t mean that the self-score is unjustified, but tutors should compare it with the normalised scores. For example, in groups that have one or more non-contributing members (who get awarded zero points) the Fairness score will always be high for the others.
If you want to look at the actual points given to each student, go to the Peer Feedback Projects page and click the link to View/Edit Groups for your project. Press Ctrl-F (Windows) or ⌘-F (Mac) to search for text on that page and type the name of the student. Click the Feedback Received button next to their name. The points are expressed as percentages, but it is easy to compare their self-score with the scores given to them by their group members and see if you think it is fair.