Parallax
The objective of this learning object is to introduce the concept of parallax and demonstrate its utility in estimating the heights of objects on the ground from pairs of aerial photos.
Relief displacement within a single aerial photograph can be used to calculate the heights of objects on the ground. But it will not be possible to use a single photo if we do not have any useful reference objects. For example, in a wholly natural area it would be very difficult to visually estimate relief displacement. In such cases, a pair of photos will be of immense use. Two photographs (stereopairs) can be used to model elevations across an area. This technique (i.e. using two photos or stereopairs) relies on the principle of parallax.
What is parallax?
Lillesand et al. (2008) define parallax as “the apparent change in relative positions of stationary objects caused by a change in viewing position”. Objects closer to a camera appear to move across a greater distance than those further away. This concept is familiar to everyone who has looked out of a moving train window and observed that objects close to the line appear to move rapidly backwards past the window, while distant objects appear to travel with the train, only slowly being left behind as the landscape changes. In the context of aerial photography, these varying displacements related to height enable the 3-dimensional viewing of two overlapping photographs. The image below illustrates how parallax is formed for two overlapping photographs over varied terrain. Parallax equals the measured coordinate of a point on the first photograph minus its position on the second photo.
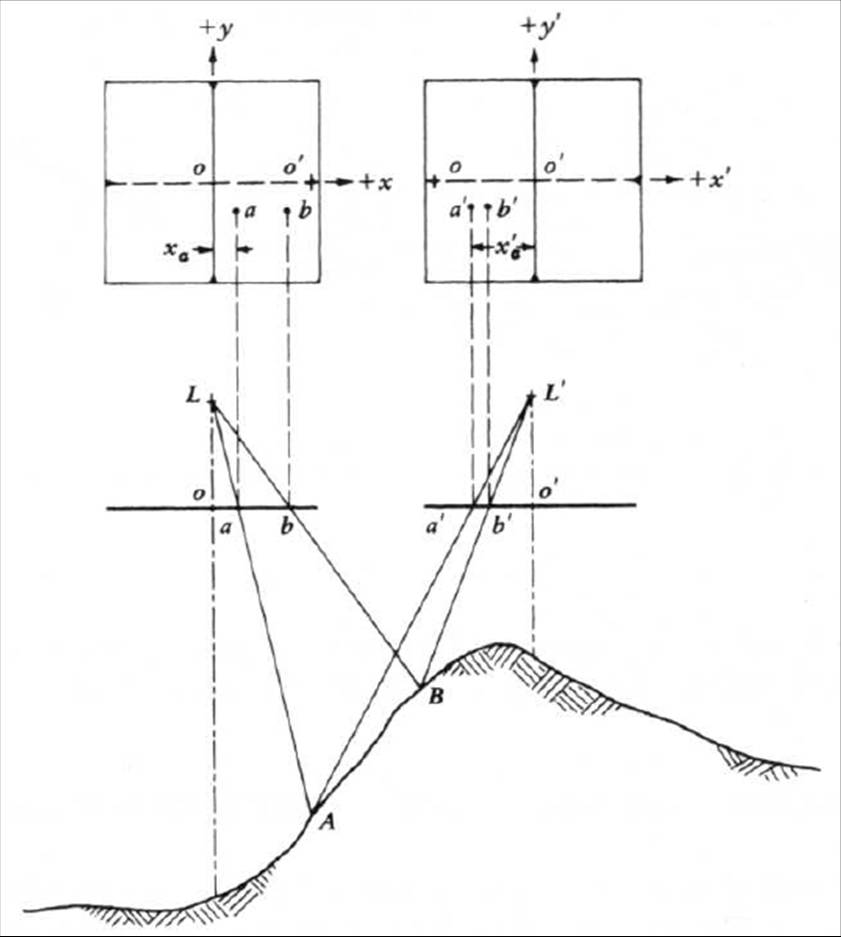
Parallax = xa – xa‘
Source: Lillesand et al. (2008).
We need to have a consistently reproducible coordinate system for the images to be able to calculate the parallax between any two points on two photographs. Initially, the successive photographs are aligned in such a way that the centres of each photograph are aligned to the flight path. Due to endlap in the successive photos, the centre point of one photo will also occur in the other photo and such points are known as conjugate principal points. Parallax can only occur along the x axis, parallel to the line of flight.
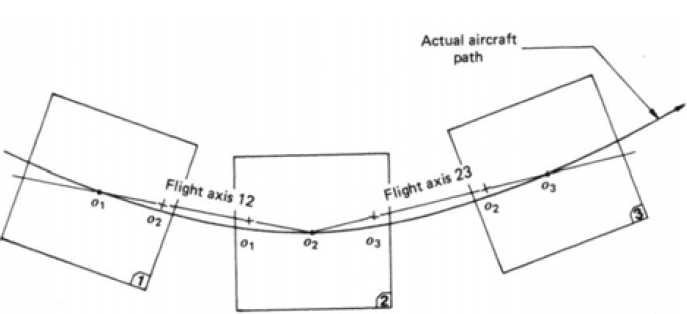
Flight path created from conjugate points of successive stereopairs.
Alignment of the flight line enables parallax measurement. If it is required to calculate parallax of many points then it would be time consuming to measure the x position in two photos. To make the process faster, an alternative method is used in which the user needs to make just one measurement to get parallax. The one measurement is the distance between the same points in two photos (i.e. ‘d’ as shown below). Knowing the airbase distance (i.e. ‘D’ remains constant) and distance d of any two points (the same ground point represented on individual photos) is subtracted to calculate the parallax at that point.
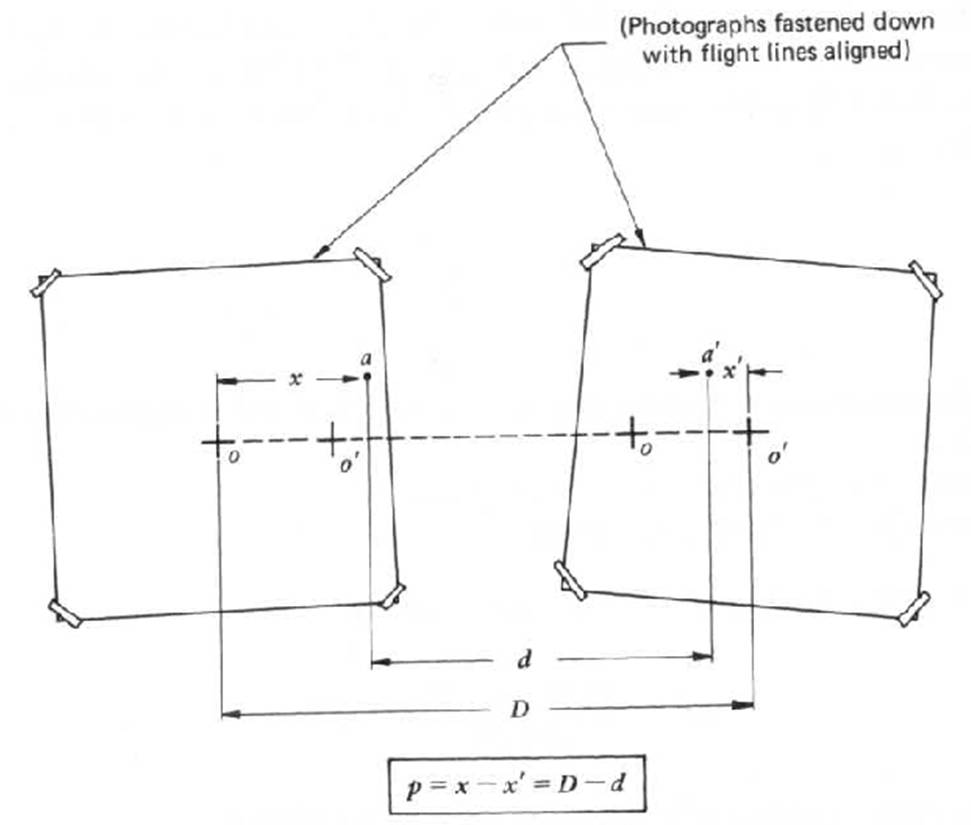
Measuring parallax through a single measurement.
Parallax can be measured using a number of analogue (i.e. visually based) devices which help form stereoscopic viewing. In such devices, parallax is measured for automatic internal orientation using the principle of floating marks. Small identical marks called half marks are placed over each photo in a stereoscopic pair. The positions of these marks are shifted along the line of flight until they visually fuse together, forming a single mark which floats at an elevation in the stereomodel. This process is illustrated below. The half marks (a, b), (a,c) and (a,d) create the floating mark positions B, C and D. In this way only the right half mark is moved to change the height of the floating mark. Only when the same point is positioned correctly (i.e. line joining a-D-d), is the correct 3D view formed.
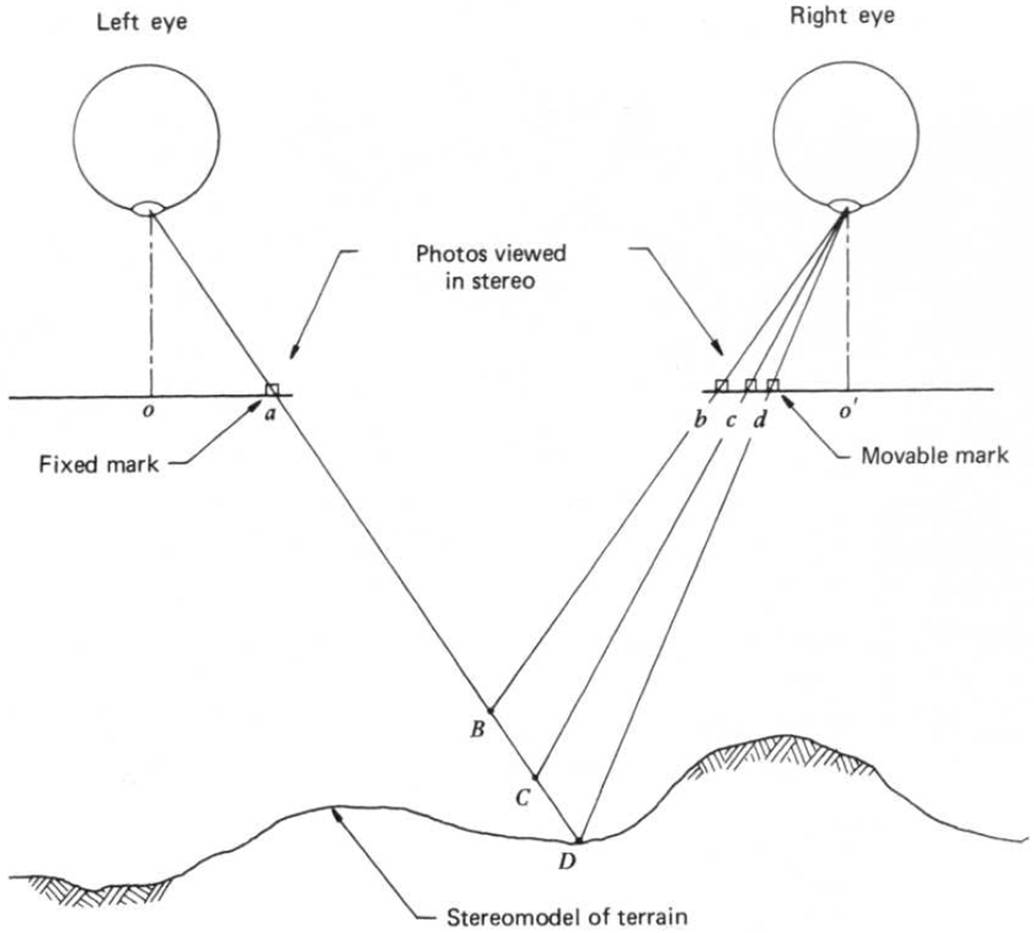
The floating mark principal. Source: Lillesand et al. (2008, p. 160).
Reading
The key text for these concepts is:
Lillesand, T. M., Kiefer, R. W. and Chipman, J. W. (2008) Remote Sensing and Image Interpretation, John Wiley & Sons, New Jersey.
Activity
If you are able to obtain access to a pocket stereoscope, this exercise will give you a real feel for stereoscopinc viewing and floating marks.
You will need:
- A Pocket Stereoscope
- Two aerial photos (either original or printed)
Process:
From the internet you can download any two continuous overlapping aerial photos. Take a printout of those images on separate A4 sheets. Identify a common point in the overlapping area, and mark it using a pencil with a symbol “+” on both the images. Now orient them along x-direction. Try to view them under the pocket stereoscope. Keep one photo in a fixed position and try to adjust the other photo while viewing them under the pocket stereoscope. Try to bring the “+” symbol in your viewing frame and try to get the marks to overlap. If the marks overlap correctly then you will be able to see the 3D stereoscopic view correctly.
Enjoy the exercise!